Comprehensive Collision Repair Process Guide: Steps & Timeline
Collision repair is the structured set of procedures technicians use to return a damaged vehicle to safe, roadworthy condition after a crash. This guide breaks down the collision repair process overview into clear stages—damage assessment, estimating, insurance navigation, structural and body repair, painting and refinishing, reassembly and diagnostics, quality control, and typical timelines—so vehicle owners understand what to expect and why each step matters. Many drivers feel uncertain about safety, costs, and length of repairs; this article explains key concepts like frame straightening techniques, paintless dent removal benefits, ADAS calibration after repair, and how insurance claims interact with repair decisions. You will learn step-by-step workflows, documentation checklists, and practical advice for choosing a reputable auto body shop, along with notes about modern tools such as virtual estimates and online repair tracking. The sections below follow the collision repair process steps and timeline exactly, providing feature-snippet-friendly summaries, lists, and comparison tables to help both car owners and shop managers make informed decisions.
What Are the Key Steps in the Collision Repair Process?
The collision repair process is a sequence of stages that starts with vehicle damage assessment and ends with final delivery and warranty communication, and each stage exists to restore safety and function. The mechanism is procedural: assess and document damage, generate an estimate, secure insurance authorization, disassemble to discover hidden damage, perform structural and body repairs, refinish and match paint, reassemble and calibrate electronics, and complete multi-tier quality control. The primary benefit for owners is predictable safety and documented repair quality; for shops, a clear workflow reduces rework and increases customer trust. Below is a concise numbered list that targets featured-snippet-style clarity and maps to detailed H3 topics that follow.
- Assessment and documentation of visible and hidden damage.
- Estimate generation and insurer coordination for approval.
- Disassembly and identification of structural or electronic issues.
- Structural/frame repair or panel replacement as required.
- Surface prep and paint refinishing with color matching.
- Reassembly, ADAS calibration, and electronic diagnostics.
- Multi-tier quality control, test drives, detailing, and delivery.
This ordered list clarifies what to expect and connects directly to later sections that expand on assessment tools, estimate contents, insurance interaction, and safety verification steps.
How Is Vehicle Damage Assessed After a Collision?
Vehicle damage assessment identifies visible and hidden problems by combining visual inspection, measurements, and digital diagnostics to determine repair scope and safety implications. Technicians inspect the frame, suspension, body panels, and underbody for deformation while using diagnostic scanners and frame-measuring systems to detect misalignment and electronic faults. The specific value is accurate scope identification that prevents surprises later; documenting with photos, VIN checks, and measurement prints supports insurance supplements and protects the owner. Owners should photograph damage from multiple angles and retain police reports, which helps when the estimator documents hidden damage that appears during disassembly.
This assessment naturally leads into how the repair estimate is generated and what line items owners will see when deciding on repair authorization.
What Does the Repair Estimate Include and How Is It Generated?
A repair estimate lists labor, parts, paint, sublet operations, and materials with time-based labor operations calculated from industry labor guides and shop-rate standards to produce a comprehensive cost projection. Modern estimate software combines photos, OEM procedures, and labor-scoping rules; the result is an itemized document showing part numbers, labor hours, paint time, and potential sublets such as glass or paint-shop work. The benefit for customers is transparency: an accurate estimate helps compare OEM versus aftermarket parts, and it outlines possible supplement paths when hidden damage appears. Estimators should include a clear notes section explaining assumptions and expected lead times to reduce later disputes and expedite insurance approval.
Understanding estimates paves the way to the insurance approval process, where documentation and clear communication often determine repair timing.
How Does the Insurance Approval Process Work for Collision Repairs?
Insurance approval begins with a filed claim and proceeds through adjuster review, authorization or negotiation, payment arrangements, and repair authorization, with supplements handled if hidden damage emerges. The mechanism is records-driven: photos, estimate details, and vehicle inspections inform the adjuster’s decision; if the insurer disagrees, documented measurements, repair procedures, and supplemental evidence are submitted for reconsideration. The primary benefit for vehicle owners is obtaining a clear authorization to proceed so repairs start without financial uncertainty. Helpful owner actions include keeping a claims log, providing photo documentation, and requesting written approvals for supplements to create an audit trail that avoids delays.
Clear documentation of approvals and supplements transitions into the hands-on structural and body repair work that follows once authorization is in place.
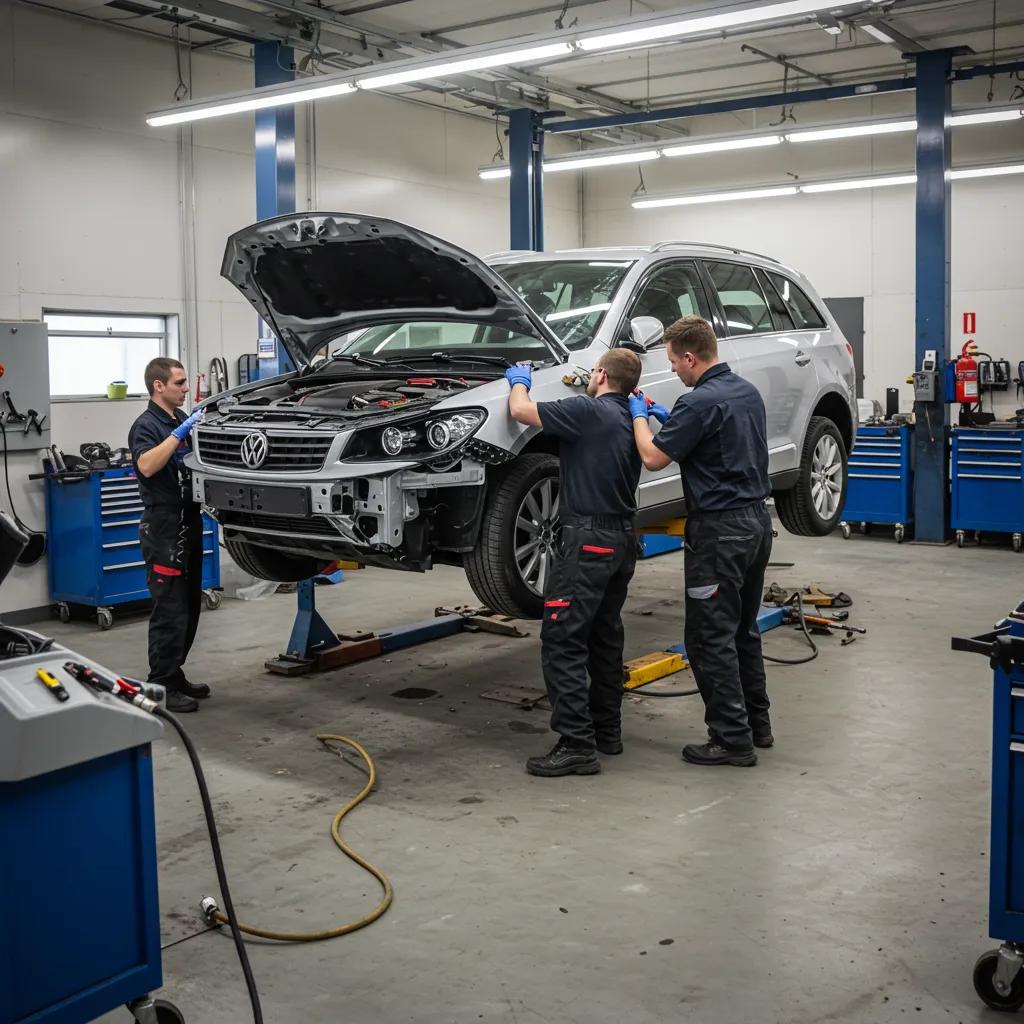
How Is Structural and Body Repair Performed in Collision Repair?
Structural and body repair restores the vehicle’s crash-energy-management systems and appearance by using measuring systems, frame machines, welding, and sectioning methods appropriate to the vehicle’s construction. The mechanism focuses on restoring specified tolerances for frame rails, unibody reference points, and attachment geometry so safety systems perform as designed; this is crucial for energy absorption and airbag timing. The benefit is returning crashworthiness and fit/finish to manufacturer tolerances so the car behaves predictably in future events. The following H3 subsections explain frame and unibody techniques, dent repair choices, and criteria for panel replacement versus fabrication.
Before examining details, a comparison table clarifies common structural repair approaches and tradeoffs.
| Technique | Typical Use Case | Pros/Cons & Time Estimate |
|---|---|---|
| Frame Straightening | Major frame rail misalignment from moderate-to-severe crashes | Pros: restores OEM geometry; Cons: requires heavy equipment; Time: 1–4 days depending on damage |
| Unibody Sectioning & Welding | Localized structural damage on modern unibodies | Pros: preserves overall structure; Cons: requires certified welding and corrosion protection; Time: 2–5 days |
| Non-Structural Panel Repair | Dents and minor panel deformation | Pros: faster, lower cost; Cons: not suitable for compromised crash structures; Time: hours–1 day |
This table shows how shops match method to damage severity and why time estimates vary, guiding the decision to repair or replace components.
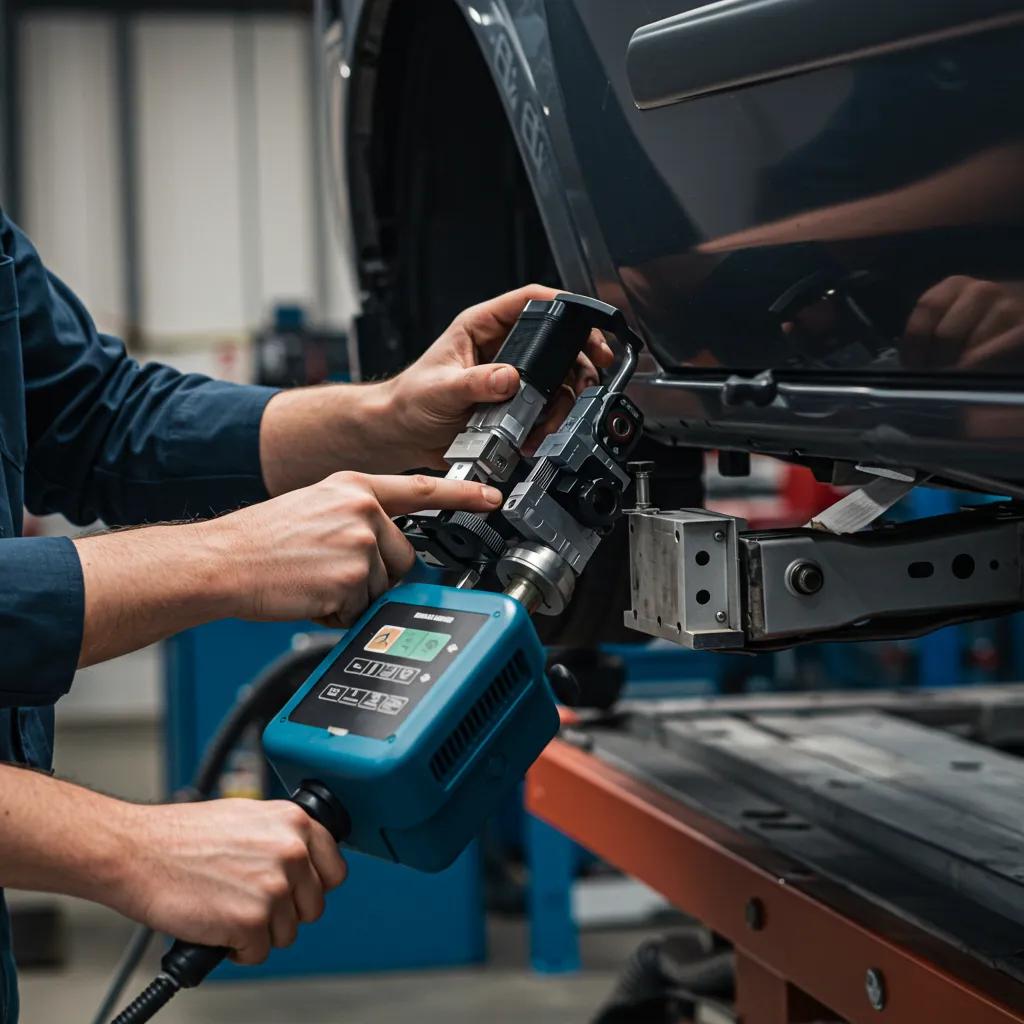
What Are Frame Straightening and Unibody Repair Techniques?
Frame straightening uses anchored pull systems and computerized measuring to bring a vehicle’s rails and reference points back to manufacturer tolerances, while unibody repair often involves sectioning, panel replacement, and structural welding to restore integrity. The mechanism is precision measurement and controlled force application: technicians pull to reference points and verify with laser measuring systems to ensure dimensional accuracy. The benefit is that safety load paths and restraint timing are preserved, reducing the risk of future failure or improper airbag deployment. Shops should document measurements before and after repair so insurers and owners have proof that the vehicle’s structure meets repair specifications.
This understanding of structural technique leads to choices about dent repair strategies when damage is primarily cosmetic.
How Are Dent Repairs Done: Paintless Dent Removal vs. Traditional Methods?
Paintless Dent Removal (PDR) reshapes metal from behind the panel without repainting, preserving factory paint and saving time, whereas traditional methods use panel beating, fillers, and repainting when the paint is cracked or crease damage is severe. PDR’s mechanism relies on access to the panel backside and controlled manipulation to restore shape; the advantage is cost and time savings while keeping OEM paint intact. Traditional methods are necessary when paint is compromised or metal is extensively creased; they require sanding, filler, primer, and basecoat/clearcoat cycles for a seamless finish. Choosing between PDR and traditional repair depends on paint condition, crease severity, and panel accessibility, and technicians should document the decision and expected finish outcomes for the customer.
Decision rationale flows naturally into when a panel should be replaced or fabricated rather than repaired.
When Are Panels Replaced or Fabricated During Repair?
Panels are replaced when damage exceeds repair thresholds, when attachment geometry is compromised, or when OEM safety performance cannot be restored; fabrication is used when parts are discontinued or aftermarket fit is inadequate. The mechanism in replacement involves sourcing OEM or equivalent parts and installing them to factory fitment tolerances, while fabrication may require patterning, metal shaping, and welding to recreate original contours. The benefit of replacement is reduced labor on shaping and guaranteed fit when OEM parts are available; fabrication can restore fit but may increase time and cost and requires skilled technicians for proper corrosion protection. Shops must inform owners about part options, lead times, and potential effects on warranty or resale value to support informed consent.
Understanding repair versus replacement leads into the refinishing processes required to match color and achieve durable finishes.
What Is Involved in the Automotive Painting and Refinishing Process?
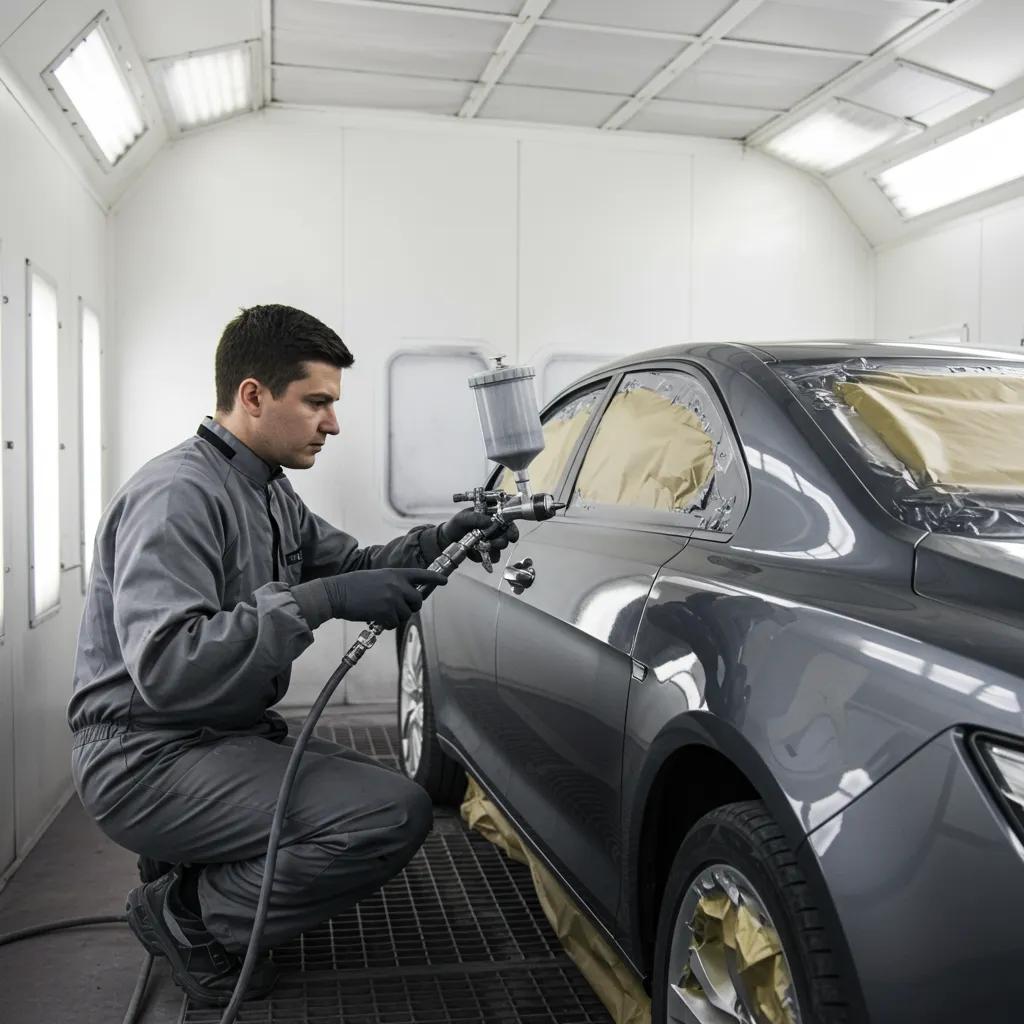
Automotive painting involves surface preparation, precise color matching, and controlled application of primer, basecoat, and clearcoat layers to recreate the original appearance and protect the substrate. The mechanism requires contamination control, correct mixing ratios, spray technique, and curing protocols to ensure adhesion and long-term durability. The primary benefit is restoring corrosion protection and visual continuity so repaired panels are durable and indistinguishable from original finish. The H3 subsections below address color matching strategies, primer/basecoat/clearcoat sequencing, and curing methods that impact final quality.
Before detailing steps, consider how paint approaches compare for time, cost, and finish quality.
| Painting Method | Surface Impact | Cost/Time/Finish Quality |
|---|---|---|
| Paintless Dent Repair (PDR) | No surface restoration required | Low cost, fastest, preserves factory finish |
| Spot Repair with Blending | Localized sanding and blended basecoat | Moderate cost, faster than full panel, requires skill for seamless blend |
| Full Panel Respray | Complete stripping and refinish of panel | Highest cost/time, best for perfect match on complex colors |
This table clarifies when blending is acceptable versus when full respray is recommended to achieve OEM appearance.
How Is Color Matching and Blending Achieved?
Color matching uses paint formula databases, spectrophotometers, and visual blending panels to recreate manufacturer color and effect pigments, especially for metallic and pearlescent finishes. The mechanism is formula selection followed by trial application and fine adjustments under controlled lighting to achieve perceptual continuity across adjacent panels. The benefit is a seamless visual transition that preserves vehicle resale and owner satisfaction; accurate matching reduces visible halos or color difference after curing. Technicians often blend into adjoining panels rather than create hard boundaries, and shops document the formula and process to support future repairs.
Color matching considerations lead to the specific sequence for primer, basecoat, and clearcoat application that follows.
What Are the Steps for Primer, Basecoat, and Clearcoat Application?
Primer application prepares and levels the substrate, providing corrosion protection and adhesion, followed by basecoat for color and effect, and finally clearcoat for gloss and environmental protection. The mechanism is layered chemistry: primers bond to metal or filler, basecoat provides the pigment layer, and clearcoat cross-links to deliver hardness and UV resistance; each step requires appropriate flash and cure times. The benefit is durable, high-gloss finishes with longevity when environmental controls and correct mixing are used. Shops must control booth temperature, humidity, and filtration to avoid defects like orange peel or fish eyes and use PPE and booth standards for technician safety.
How Does Curing and Drying Affect Paint Quality?
Curing and drying transform applied coatings into a hard, bonded finish; methods include ambient cure, forced-air ovens, and infrared systems, each affecting hardness, solvent release, and final appearance. The mechanism is time-temperature controlled polymer cross-linking: insufficient cure leaves soft or porous finishes prone to damage, while correct schedules optimize hardness and UV resistance. The benefit of proper curing is reduced risk of defects like runs, wrinkling, or premature fading and improved long-term durability. Shops should follow manufacturer cure charts and document oven cycles to ensure consistent outcomes that meet warranty expectations.
With finish complete, the vehicle moves into reassembly and systems diagnostics to ensure functionality and safety.
What Happens During Reassembly and Post-Repair Diagnostics?
Reassembly and post-repair diagnostics restore mechanical connections, fastener torques, alignments, and electronic systems, concluding with verification tests and road testing to validate safety and functionality. The mechanism includes following torque specifications, performing suspension alignment to factory angles, and running OBD scans and functional checks on ADAS and ECUs to ensure proper operation. The main benefit is confirming that repairs integrate with mechanical and electronic systems so the vehicle operates safely and as intended. The H3s below explain installation and alignment, ADAS calibration importance, and post-repair electronic checks that ensure comprehensive verification.
This systems verification sets up quality control procedures that catch defects before delivery.
How Are Components Installed and Aligned After Repair?
Component installation follows manufacturer torque specs and fastener procedures, with suspension and steering alignments performed to restore handling characteristics and prevent uneven tire wear. The mechanism is the precise reinstallation of parts followed by geometric alignment using laser or optical equipment to verify toe, camber, and caster within specified tolerances. The benefit is restoring predictable handling and tire life while ensuring body panels and closures fit correctly for noise and weather sealing. Shops typically record torque values and alignment printouts to document compliance and provide reassurance to owners and insurers.
Accurate mechanical reassembly must be paired with electronic recalibration where applicable, which is addressed next.
Why Is ADAS Calibration Important After Collision Repair?
ADAS calibration ensures sensors such as cameras, radar, and lidar accurately perceive the vehicle’s surroundings by aligning sensor aim and software parameters to manufacturer specifications after any repair that affects sensor mounting or geometry. The mechanism involves static or dynamic calibration routines using targets or driving procedures to confirm systems like lane-keep assist, automatic emergency braking, and adaptive cruise operate correctly. The critical benefit is safety: miscalibrated ADAS can delay braking or misjudge lane position, creating hazard risks and legal liability. Shops should document calibration procedures and provide calibration certificates when required to show due diligence.
What Post-Repair Electronic System Checks Are Performed?
Post-repair electronic checks include comprehensive OBD scans, ECU status verification, sensor functional tests, and any required OEM software updates or reprogramming to align modules after part replacement. The mechanism is a systematic scan-and-test workflow: technicians clear historical codes, monitor live data, and run actuation tests on sensors and actuators to verify proper responses. The benefit is preventing intermittent faults or warning lights that could lead to customer dissatisfaction or safety issues, and documenting that the vehicle meets electronic readiness standards. Shops should retain scan reports and note any software reprogramming completed, as these records support warranty and insurance documentation.
Once diagnostics confirm systems are operating, the vehicle proceeds to formal quality control and customer communication.
How Is Quality Control Ensured Before Vehicle Delivery?
Quality control is a multi-tier inspection process that combines technician checks, quality inspector verification, management sign-off, function testing, and a documented customer handover to ensure repairs meet safety, cosmetic, and procedural standards. The mechanism is layered verification: technicians perform initial checks, a quality-control inspector rechecks repairs and documentation, and management validates scope, supplements, and warranty terms before release. The benefit is a lower rate of comebacks, documented repair quality, and higher customer confidence through transparent handover. Below are H3 subsections describing safety test drives, detailing, and management inspection protocols, and a paragraph recommending digital communication tools shops can use to keep customers informed.
Before test drives, shops should prepare a focused checklist to exercise repaired systems and capture observable performance.
- A test-drive checklist highlights key systems to validate before customer delivery:
- Brake performance and pedal feel under varied speeds and loads.
- Steering response, lane tracking, and vibration/noise detection.
- Suspension behavior over bumps and acceleration response.
What Safety Checks and Test Drives Are Conducted?
Safety checks and test drives exercise brakes, steering, suspension, and critical electronic systems to validate repair integrity under realistic conditions and detect noises, vibrations, or handling anomalies. The mechanism uses structured test routes and checklists to evaluate stopping distance, pedal response, steering alignment feel, and ADAS behaviors to confirm that repairs restored designed performance. The benefit is catching defects that static checks miss and documenting the vehicle’s operational status before delivery, protecting both the customer and the shop’s reputation. Any issues discovered are documented and fed back into the repair workflow for corrective action before the management sign-off stage.
How Is Detailing and Cleaning Done Before Delivery?
Detailing and cleaning prepare the vehicle for presentation by removing paint overspray, decontaminating the finish, vacuuming and sanitizing the interior, and performing minor cosmetic touch-ups to ensure a professional handover. The mechanism includes wet sanding, polishing, paint decontamination, and interior sanitation so the vehicle returns to the customer in a state that reflects care and attention to detail. The benefit is improved perceived value and customer satisfaction, which supports positive reviews and warranty confidence. Shops often photograph the finished vehicle and include these images in customer communications as proof of condition at delivery.
What Does the Management Inspection and Standards Verification Include?
Management inspection verifies that all repair tasks match the approved estimate and any supplements, confirms warranty and paperwork completion, and ensures customer-facing documents explain aftercare and warranty coverage. The mechanism is a final cross-check of labor performed versus authorized work, review of parts used (OEM vs aftermarket), and confirmation that ADAS calibrations and electronic checks are documented. The benefit is managerial accountability: a signed sign-off reduces disputes and ensures clarity on long-term support and any limitations. Shops should present a concise handover packet and walk the customer through repairs, warranties, and recommended next steps to close the loop professionally.
Shops can enhance customer communication and transparency through digital tools such as photo progress portals and online repair tracking. Integrating online portals, automated photo updates, and customer-facing workflow pages improves clarity and reduces call volume, and shops seeking help implementing these features can work with specialist digital marketing and website solution providers. Mid Michigan Interactive offers website design and website maintenance services that help auto body shops build client-facing portals, and local search optimization, search engine optimization (SEO), and reputation marketing services that make those capabilities easier for customers to find and trust.
How Can Customers Navigate Insurance Claims and Choose a Reputable Auto Body Shop?
Customers navigate claims and shop selection by following a structured claims checklist, understanding OEM versus aftermarket part tradeoffs, and using objective shop-evaluation criteria such as certifications and online reputation. The mechanism involves documentation-driven interaction with insurers plus evidence-based shop evaluation to ensure safety and quality. The benefit is empowered decision-making: better documentation speeds approvals and careful shop selection protects safety and resale value. The H3s below provide a detailed claim-management checklist, a parts-comparison matrix, and a shop-evaluation buyer checklist to aid both owners and shops that want to present credentials clearly online.
Below is a step-by-step checklist customers can follow immediately after an accident and during the claim process.
- Take clear photos of all damage and the scene from multiple angles.
- Secure a police report and note witness information if available.
- File a claim promptly and provide photos, VIN, and initial estimate.
- Keep a written log of adjuster contacts, approvals, and payment commitments.
This checklist reduces disputes by creating an auditable record and prepares owners for the adjuster visit and estimate review.
What Are the Steps to File and Manage an Auto Insurance Claim?
Filing and managing a claim starts with safety and photos, then progresses to filing with the insurer, scheduling an adjuster inspection, receiving authorization, and tracking supplements with documented evidence. The mechanism is methodical: immediate photos and police reports feed into the insurer’s claim file, adjuster reviews and notes create an initial authorization, and any discovery of hidden damage triggers supplements that are documented and negotiated. The benefit is a transparent trail that supports timely payment and minimizes disputes; owners should request written approvals and keep copies of invoices and scan reports. Proactive communication and a centralized folder of photos and documents will speed supplement processing and clarify responsibilities.
What Are the Differences Between OEM and Aftermarket Parts?
OEM parts are manufactured to original specifications and generally provide the best fit, safety compatibility, and warranty alignment, while aftermarket parts offer cost and availability advantages but vary in fit and performance. The mechanism differs by source: OEM parts come from the vehicle maker or licensed suppliers and match original attachment points and crash performance characteristics; aftermarket parts may require modification or acceptance of minor fit differences. The benefit of OEM parts is reduced likelihood of fit-related issues and better long-term compatibility with safety systems, whereas the benefit of aftermarket is faster turnaround and lower immediate cost. Shops should document part choices in writing and obtain customer consent when aftermarket or recycled parts are proposed.
To help consumers choose, here is a buyer checklist for evaluating an auto body shop’s credentials and reputation.
- Look for certifications such as I–CAR training and documented OEM program affiliations.
- Assess online presence: recent reviews, before-and-after galleries, and clear estimate transparency.
- Confirm warranty offerings on repairs and parts, and request sample paperwork showing terms.
These criteria help owners compare shops objectively and highlight why documented credentials matter for safety and future resale.
What Is the Typical Collision Repair Timeline and What Factors Affect It?
Typical repair timelines vary by damage severity but follow stages with expected durations that help set owner expectations and allow shops to plan resources efficiently. The mechanism is stage-based: assessment, parts ordering, structural and body repair, paint and cure, reassembly and calibration, then QA and delivery; each stage’s duration depends on parts availability, hidden damage, insurer responsiveness, and vehicle complexity such as EV systems or ADAS. The benefit of understanding timeline drivers is realistic planning and better communication between shops, insurers, and owners to minimize delays. The following H3s provide typical ranges, explain delay causes, and show how modern technologies shorten turnaround through digital workflows.
Before detail, a compact table shows typical stage durations and common delay factors.
| Stage | Typical Duration | Factors That May Extend Duration |
|---|---|---|
| Assessment & Estimate | 1–3 days | Adjuster availability, initial documentation |
| Structural & Body Repair | 2–7 days | Severity of damage, access to qualified welders |
| Painting & Curing | 1–5 days | Color complexity, booth scheduling, curing method |
| Reassembly & Diagnostics | 1–3 days | ADAS calibration needs, ECU reprogramming |
| Final QA & Delivery | 1–2 days | Rework discovered during test drives or document sign-off |
This table gives owners a baseline and shows how specific factors influence the overall timeline.
How Long Does Each Repair Stage Usually Take?
Each repair stage has a range: initial assessment and estimate commonly take 1–3 days, structural repairs 2–7 days, painting and curing 1–5 days depending on color complexity, reassembly and diagnostics 1–3 days, and final QA 1–2 days. The mechanism behind variability includes part lead times and the need for specialized technicians for frame work, welding, or ADAS calibration. The benefit of sharing realistic ranges is managing customer expectations and reducing stress from open-ended timelines. Shops should communicate projected windows and update owners when supplements, part delays, or insurer approvals change those estimates.
What Factors Can Extend or Shorten the Repair Process?
Common factors that extend repair time include parts backorders, insurance approval delays, discovery of hidden damage during disassembly, and the complexity of ADAS or EV systems that require specialized diagnostics and calibration. Conversely, factors that can shorten turnaround include proactive parts ordering, virtual estimate tools that speed initial approvals, and well-documented supplemental workflows that reduce negotiation time with insurers. The mechanism to shorten delays is process optimization: clear photo evidence, pre-authorization for typical supplements, and adoption of OEM parts portals and digital ordering systems. Customers and shops both benefit when documentation is timely and communication is proactive to minimize avoidable downtime.
How Do Modern Technologies Impact Repair Duration?
Digital estimates, OEM parts portals, advanced diagnostic equipment, and ADAS calibration tools reduce discovery time and speed approvals by delivering precise data quickly to adjusters and parts suppliers. The mechanism involves replacing slow manual steps with photo-based virtual estimates, electronic parts ordering that shortens fulfillment time, and onboard diagnostic interfaces that reveal faults sooner. The benefit is measurable time savings: virtual estimates can cut initial approval delays by days, and direct parts portals reduce week-long backorders to days when inventory is visible. Shops that communicate repair status with customers via online portals and use modern diagnostics tend to reduce cycle time and improve customer confidence.
Shop owners who want to showcase these capabilities online and capture local leads can benefit from targeted digital services. Mid Michigan Interactive provides local search optimization, search engine optimization (SEO), reputation marketing, and website design services that help auto body shops present repair workflows, virtual estimate options, and progress portals to prospective customers and streamline lead generation for repair work.
This final integration point highlights the value of pairing technical repair excellence with clear online communication to improve both customer experience and business performance.